Friday, January 28, 2011

friday fabric focus - {kokka edition}

Sometimes you just need your share of cuteness... (aaargh, the c-word!)
What better way to get it with some kokka fabrics (plus some unidentified pieces)?
Most of them are in my stash for quite a long time...and still intact, because I just can't bear to cut into them (well, I HAVE cut into the matryoshka doll fabrics already...but it was only a teeny tiny piece so maybe it doesn't count?)

Manchmal braucht man einfach eine Portion Niedlichkeit.
Und da eignen sich die kokka Stoffe (und ein paar nicht-identifizierte) ziemlich gut, oder?
Die meisten der gezeigten Stöffchen sind schon eine Weile in meinem Besitz und immer noch an einem Stück, da ich es einfach nicht über mich bringe, sie zu zerschnippeln (naja, den Matrioschka-Stoff habe ich tatsächlich schon in einem Mug Rug verwendet, aber es war nur ein winziges Stück und zählt wahrscheinlich nicht, oder?)
I'm back from my trip and still try to catch up with everything (should I tell you that my reader schowed more than 900 new posts? flickr threads included, but a huge number nonetheless...)

Ich bin zurück von meinem Familienurlaub und immer noch dabei, alles aufzuholen (kaum zu glauben, aber in der einen Woche sind mehr als 900 neue Posts in meinem Reader aufgelaufen. Naja, flickr Threads waren auch daber, aber trotzdem nicht gerade wenig...)

Tuesday, January 25, 2011

Fabric Diet!

Maybe you've noticed one of the new buttons on my sidebar...yep, this one...

Vielleicht habt Ihr einen der neuen Buttons in meiner Sidebar schon bemerkt...jepp, dieser hier
Yes, I finally accept it. I need a diet, a fabric diet that is. Too many fabrics in my cupboard (on the shelf, above and underneath :) ).
I know that I can't buy nothing a whole year long. A more realistic goal is not to buy fabrics for (at least) 8 weeks. This Challenge was initiated by Angela of Cut to Pieces.
Actually, I haven't bought fabrics since before Christmas (oh my, even I notice how addicted that sounds *lol*). Until now I'm pretty fine...but then again, an envelope arrived last week...heehee.
Otherwise...I have filled some virtual carts with yummy fabrics...but finally deleted them. Good girl, don't ya think?

Genau, ich hab's endlich eingesehen. Ich muss etwas Diät halten. Zu viele Stöffchen im Schrank (im Regal, darunter, und und und :) ).
Ich weiß garantiert, dass ich es NICHT aushalte, ein ganzes Jahr KEINEN Stoff zu kaufen. Ein realistischeres Ziel ist daher die 'Challenge' von Angela @ Cut to Pieces:
8 Wochen ohne Stoffkäufe ab dem 1.1.!
Ha, das sollte doch zu schaffen sein, oder? Tatsächlich habe ich schon vor Weihnachten das letzte Mal auf einen dieser verführerischen Knöpfchen gedrückt (oh je, ich merke selbst, WIE süchtig sich das anhört...*lach*). Noch geht's mir prima...aber es war ja auch noch ein Umschlag in der letzten Woche angekommen...hehe.
Ansonsten habe ich zwar schon öfters einen Warenkorb voll geklickt, ihn aber danach brav wieder gelöscht. Good girl, don't ya think?

P. S.: This night I'll be home again...yay!

P.S.: Heute Abend werd' ich wieder zu Hause sein...yay!

Sunday, January 23, 2011

Swap Galore!

YAY! I'm IN!
In?
Yessss! I participate in the famous Doll Quilt Swap, Round 10 on flickr!!!!
I'll make a doll quilt for my secret partner (secret for anyone but me & the swap mamas) and will recieve a doll quilt especially made for me!
YAY again!

Jippiee! Ich bin dabei!
Wobei? Ich darf beim berühmten Doll Quilt Swap, Round 10 auf flickr mitmachen!!!
Ich werde einen Doll Quilt (12"-24") für meinen geheimen Partner nähen (geheim für alle außer moi & die Swap Mamas) und bekomme auch einen zurück, den jemand anderes extra für mich nähen wird!
YAY!
This round's blog button is made by Amy of badskirt, it features her Blythe doll, named Smith.
But more impressing is the teeeeeeeny tiny circle of geese quilt top she holds in her hand.
Awesome...Amy is a really talented quilter!
{I tried myself to create a button, it even made 3rd place in the blog button contest:}

Der Blogbutton dieser Runde wurde von Amy (badskirt) entworfen. Es ist ein Foto ihrer Blythe Puppe namens Smith. Was aber viel interessanter ist, ist der wiiiinzige Circle of Geese Quilt, den die Kleine in der Hand hält.
Wahnsinn!
{Ich habe mich auch mal am Blog-Button-Designen versucht, das Ergebnis hat es immerhin auf den 3. Platz beim Wettbewerb gebracht:}
Anyways, in order to make it easier for our partners we were ask not only to list our likes & dislikes, but also to create a mosaic of our favourites.
I really had a hard time doing this, because I like each of the 1,357 tagged pictures!
But as the mosaic maker only permits 36 photos at once, I had to narrow it down...here it is:

Naja, um es unserem Partner etwas einfacher zu machen, wurden wir neben einer Auflistung von Vorlieben und Abneigungen gebeten, ein Mosaik unserer flickr-Favourites zu machen.
Es war wirklich sehr schwierig für mich, da ich eigentlich alle1 357 als Favourites markierten Fotos!
Da der Mosaic Maker lediglich 36 Fotos erlaubt, musste ich es etwas einengen...und hier ist es (unterm Mosaik sind die Links zu den Originalfotos):
1. KL's HST block, 2. bunting mug rug, 3. Union Jack Quilt Block 4, 4. spring in the sitting room!, 5. little bird quilt, 6. Dresden Plate Doll Quilt 2004, 7. turquoise bird pillow, 8. FMF mug rug - sent to Shanz!!, 9. My Nicey Jane FQ quilt along top, 10. Nicey Jane Mug Rug, 11. snowballs 3, 12. my new bedding set, 13. King-Size Single Girl, 14. Joseph's Coat - Block 1, 15. Green Sunburst Quilt, 16. hi, 17. i love red & aqua, 18. I Love Patchwork Preview - Calendar, 19. Erdbeerzeit, 20. pickle dish block, 21. Inspiration: Golden Roots, 22. French General rouinneries quilt, 23. a thank you note., 24. Pillow Talk Swap (ready to send), 25. hexagon pillows!, 26. Owl Softie in Lotus - back, 27. dqs8 possible finished and washed, 28. Oh Christmas Tree... [Explore], 29. Mug Rug from Felicity, 30. Cherry & White Garland Pouch, 31. one more tiny hoop ornament..., 32. Fence Stripe Baby Quilt - Pink and Green Back, 33. Neptune Quilt, closer view, 34. There has to be a crumb somwhere..., 35. Mug Rug 'Shrooms, 36. Last-Minute Patchwork + Quilted Gifts
I hope it'll help my partner to get started. I'm sure I'll love what I'll recieve.
Can't wait to start on mine...perhaps I need some thinking-chocolate to set the ideas free :).

Ich hoffe, dass dies meinem Partner helfen wird...ich bin jedoch sicher, dass ich meinen zukünftigen DQ lieben werde.
Ich freue mich schon, selbst mit dem DQ-Entwerfen anzufangen...ich denke, da ist wieder ein bisschen Denk-Schokolade nötig!

P. S. I'm still about 700 kms South-West of my computer...will be back on Tuesday night. :)

P.S. Ich bin immer noch etwa 700 km südwestlich meines Computers und werde erst Dienstag Nacht zurück kommen. :)

Friday, January 21, 2011

friday fabric focus - {aqua & white}

Yes, I know the graph paper print by Cosmo Cricket for Andover Fabrics has been featured more than once. But last week an envelope from the US arrived after a more than six weeks' travel. The envelope  had some special fabric-y goodess inside: the dotted lines!
Not in that envelope but a bit "older" is the 'Quilter's Linen' by Kaufman. The linen structure is printed on cotton. I was curious how it would be...first I wasn't so sure about it (because somehow I missed that it wasn't actually linen), but the longer I look at it, the more I like it!

Ja, ich weiß, der Milimeterpapier-Stoff von Cosmo Cricket für Andover Fabrics hatte schon mehr als einen Auftritt hier, aber heute ist er nur Komparse für seinen Partner, der nach einer Reise von mehr als sechs Wochen endlich bei mir angekommen ist!
Nicht in der gleichen Sendung, sondern schon etwas 'älter' ist der hellblaue 'Quilter's Linen' Print von Kaufman. Die Leinenstruktur ist tatsächlich nur aufgedruckt auf die Baumwolle. Ich war neugierig wie der Stoff in natura sein würde...erst war ich nicht so begeistert, da ich irgendwie verplant hatte, dass das gar kein Leinenstoff ist (jaja, lesen macht kluch!), je länger ich den Stoff jedoch betrachte, desto besser finde ich ihn!
Time to practice some writing like others already have done:

Zeit, ein bisschen Schreiben zu üben, so wie es andere schon gemacht haben:
source:
1. zipper pouch, 2. ::hello::, 3. a thank you note.h

Thursday, January 20, 2011

Accuquilt GO! Cutter ~ {Apple Core Tutorial, Part II}

Okay, part II of the apple core table runner tutorial!
Okay, Teil II des Apple Core Tutorials!

1. For the center you'll need 18 ACs. Lay them out in a  3 x 6 grid until you're pleased with the arrangement

1. Für die Mitte braucht man 18 ACs, die man in einer 3 x 6 Anordnung auslegt, bis einem die Verteilung der Stoffe gefällt.
2. See the notches? They tell you where you'll have to match up the fabrics. To sew together two ACs align the edges of the concave curve right side up and the convex curve of the other AC wrong side up on top and begin sewing with a 1/4" seam allowance.

2. Seht Ihr die Kerben? Sie zeigen, an welchen die Stoffe aufeinander treffen müssen. Um 2 ACs zusammenzunähen, legt die konkave Rundung mit der rechten Seite nach oben und die konvexe Kurve darauf, mit der linken Seite oben. Näht langsam mit einer 1/4" Nahtzugabe.
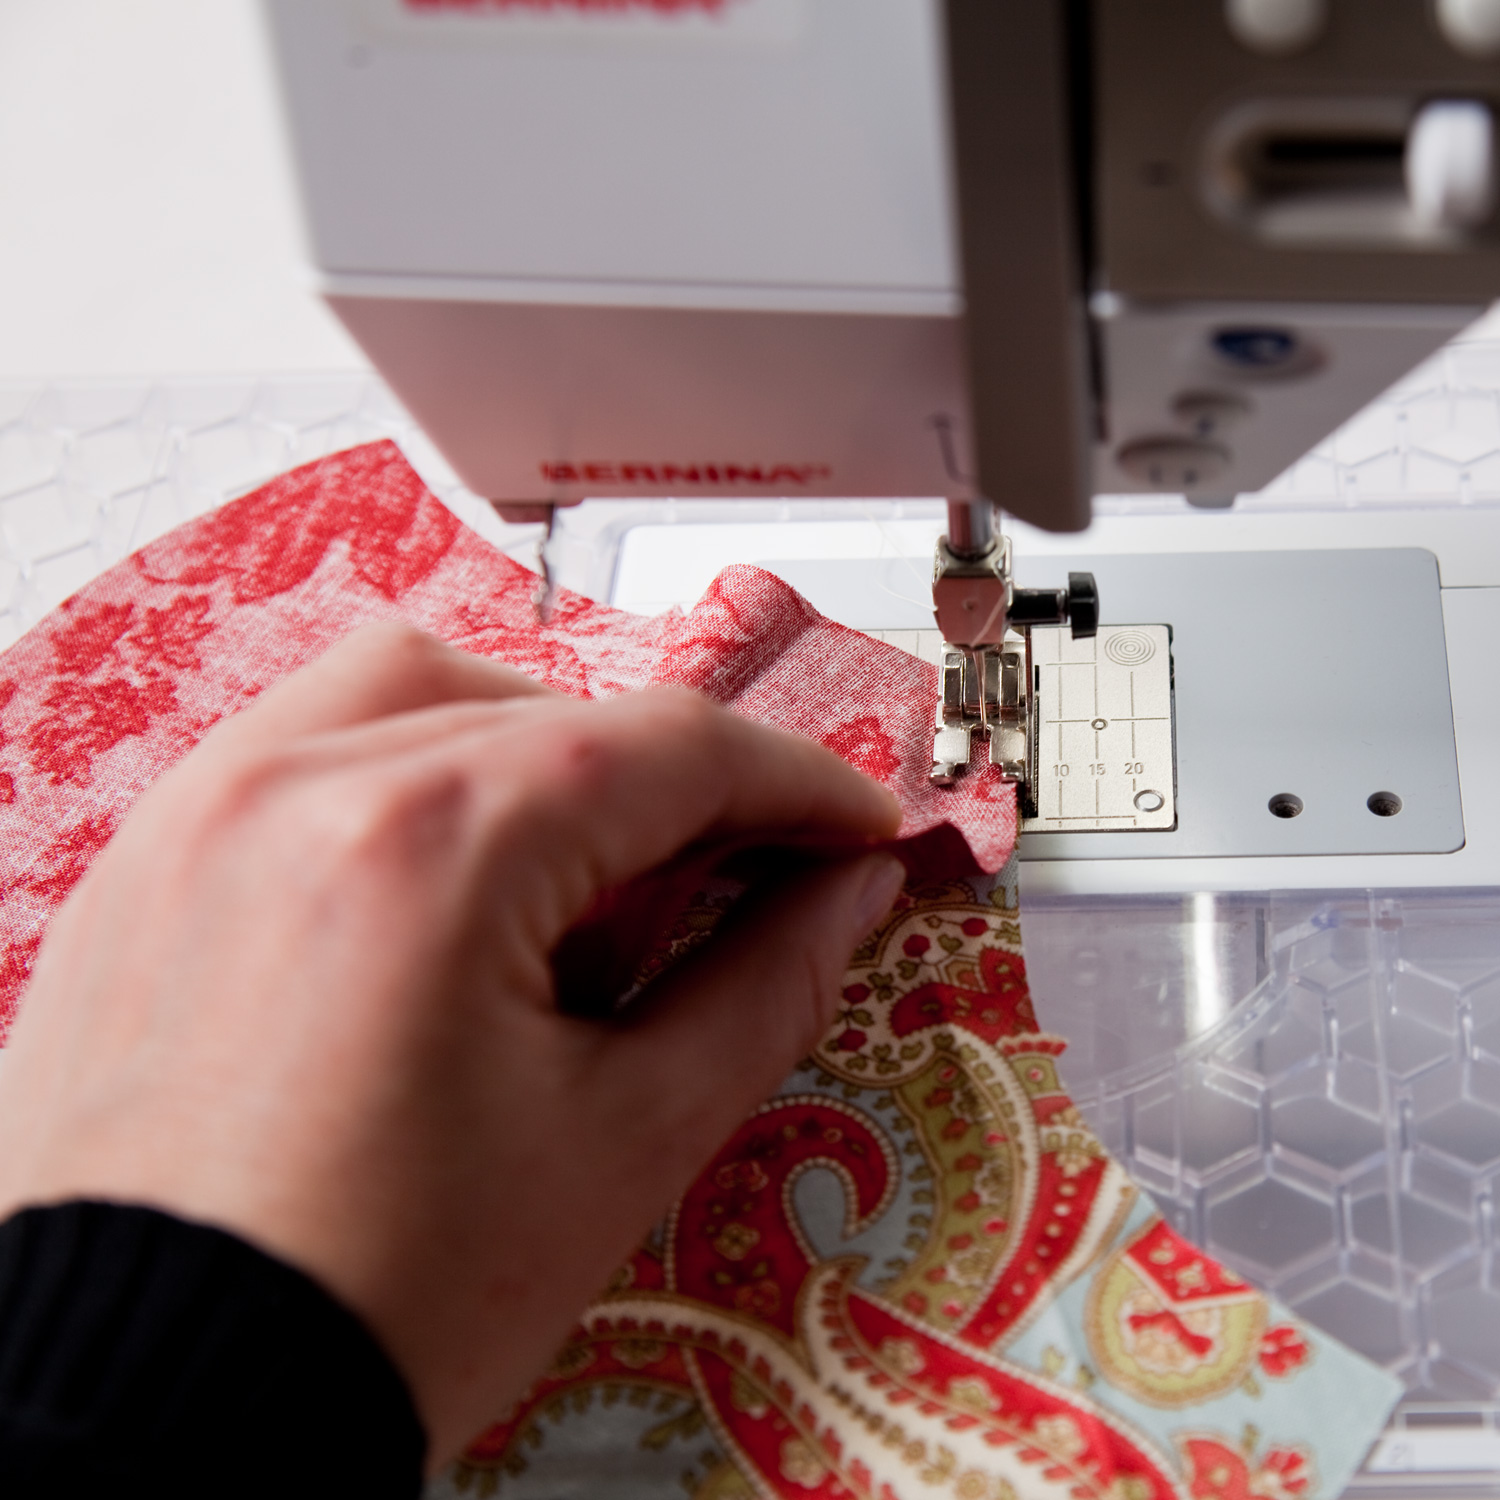
3. NO NEED TO PIN!!! Really, you don't need to! Just guide your fabric between your fingers while you sew. Only align the next couple of centimetres.

3. IHR BRAUCHT KEINE STECKNADELN!!! Wirklich, braucht man gar nicht! Führe den Stoff zwischen Deinen Fingern während des Nähens und lege jeweils nur ein paar Zentimeter im Voraus übereinander.
4. The more you sew, the bulkier gets the sewn piece. No problem, it has to be.
 
4. Je weiter man näht, desto wurstiger wird das bereits genähte Stück. Kein Problem, das muss so :).
 5. Align the notches.

5. Die Kerben müssen aufeinander treffen.
 6. Guide your ACs right to the needle, here the stiletto is quite helpful!

6. Führe die ACs direkt bis zur Nadel, hierbei hilft ein Stiletto ungemein!
 7. Repeat.

7. Das Ganze wiederholen.
 8. Press toward the concave curve.

8. Die Nahtzugabe wird zur konkaven Seite hin gebügelt.
9. Because the seam allowances were pressed toward the concave curve, they nest perfectly. Again, no need to pin, just align the intersection. Of course, now it's impossible that only one curve is on the bottom!

9. Da die NZG nur in Richtung der konkaven Rundung gebügelt wurde, passen sie perfekt aufeinander. Und wieder gilt: Keine Stecknadeln notwendig, passt nur auf dass die Kreuzungspunkte sich auch treffen. Natürlich kann man jetzt die konkav-konvex-Reihenfolge nicht einhalten!
 10. Rip out a few stitches in the seam allowance in order to swirl the seam allowance.

10. Trenne ein paar Stiche innerhalb der NZG auf um diese aufzufächern.
Ta-daaa!
 11. Make a row 3 ACs out of a chosen background fabric and sew on one of the short sides.
Align your ruler at the middle notches and cut lengthwise.
Attach the other half to the other side! 
You'll need to rip one of the half ACs from this piece and attach another half, because of the orientation of the curves...
11. Nähe eine Reihe von 6 AC aus einem Hintergrundstoff und füge sie an eine der langen Seiten.
Richte das Lineal an den Mittel-Kerben aus und schneide sie in der Mitte durch.
Nähe die abgeschnittene Hälfte an die andere Seite!
Man muss einen der Halb-ACs abtrennen und auf der anderen Seite einen weiteren drannähen, damit es passt...
12. Repeat with the short sides!

12. Das Ganze wird an den kurzen Seiten wiederholt!
The top is finished, but still looks quite boring...but it won't stay that way - so I hope to post the 3rd part of this tutorial soon :).

 Das Top ist soweit fertig, aber sieht noch recht langweilig aus...aber das soll nicht so bleiben - ich hoffe, der 3. Teil des Tutorials kann bald gepostet werden :).