
O.K., ich hab vergessen, dass ich ein kleines Tutorial für ein individuelles Memoboard geplant hatte. Vor einigen Wochen stand ich vor dem Problem, für eine Freundin, die ich schon länger nicht mehr gesehen hatte, etwas Nettes zum Geburtstag zu zaubern. Da fiel mir ein, dass ich letztes Jahr (oder war's vorletztes???) für zwei andere Freundinnen ein Memoboard gebastelt habe...und dass sie ziemlich gut angekommen sind ;o).
Naja, also habe ich eine neue Pin- und Steckwand gebastelt und dabei fleißig Fotos für Euch gemacht... Und gerade als ich damit fertig war, habe ich im Netz ganz viele Tutrorials dafür gefunden...*hmpf* - egal, ich hab mir die Arbeit gemacht und zeige es Euch trotzdem *ätsch*
Natürlich gibt es viiiiele Möglichkeiten, zum Ziel zu kommen und das Rad habe ich damit auch nicht neu erfunden, besonders kompliziert ist es auch nicht, aber vielleicht inspiriert es ja den/die Eine/n oder Andere/n ;o).
 O.K., I forgot that I planned to show a little tutorial 'how to make your own memoboard'...some weeks ago I had the problem to find the right birthday gift for a friend I hadn't seen a long while. I remembered making some memoboards for other friends last year (or the year before???) and that both really liked them ;o). So I made another one & I actually thought to take pictures for you...and just as I was finished with this tutorial I found many other in the wide spaces of the www....*hmpf*. I show it anyway...of course there are maaaany ways to do it, it isn't complicated and I didn't reinvent the wheel - but perhaps it inspires somebody ;o).
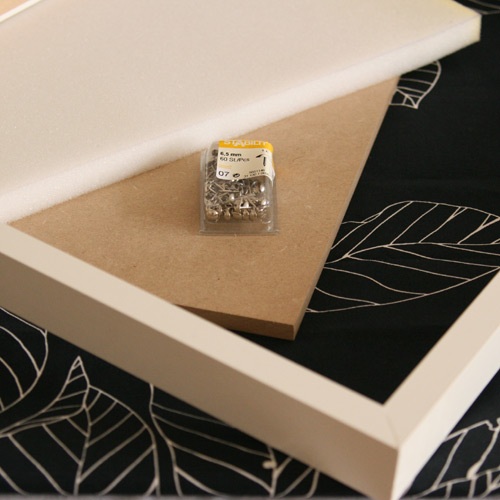 #1 Benötigtes Material: 1. Bilderrahmen (ich habe diesen Rahmen, Größe 40x50 cm vom Elch besorgt und entsprechend alles andere angepasst), 2. MDF-Platte (Stärke 10 mm, Größe 39.5 x 49.5 cm), 3. Schaumstoff (gleiche Größe wie MDF-Platte, Dicke 20 mm, da 10 mm ausverkauft), 4. Polsternägel (6.5 mm, kleinere gab's nicht, sonst hätte eine dünnere MDF-Platte ausgereicht. Da ich für den Elektrotacker nur größere Klammern hatte, sind wir auf diese Möglichkeit ausgewichen), 5. Stoff (hier: fester BW-Stoff, auch vom Elch...habe aber auch schon Stretch-Satin mit chinesisch angehauchtem Muster verabeitet), 6. mind. 3 m Schrägband (oder Satinband, Gummiband, je nachdem, was passt...u. U. länger...) außerdem Hammer und (optional) Sprühkleber zum Fixieren des Schaumstoffs auf der Platte
 #1 You need: 1. Frame (I took this one from IKEA, 40 x 50 cm, 'discarded' the glass), 2. medium density fiberboard (a tiny bit smaller than the frame, 39.4 x 49.5 cm, 10 mm, could be thinner if your nails were shorter), 3. tin-plated tack (6.5 mm, if you have an electric staple gun which provides shorter clamps, then use them instead and adjust the mdf size), 4. rubber foam (same size as mdf, 20 mm or thinner), 5. fabric (I used sturdy cotton, also from IKEA, but have tried satin, too...whatever you like ;o)), 6. minimum 3.5 yd bias tape, elastic tape or satin band...then, of course, a hammer, and (optional) spray-on glue.
#2 Kleben: Nun legen wir {ganz wichtig  ;o)} eine Unterlage auf unseren Boden und beginnen, in dem wir die MDF-Platte mit Sprühkleber einnebeln {nicht uns - das Zeug ist echt lästig auf Haaren, Händen und Hund}, kurz antrocknen lassen und dann die Schaumstoff-Platte darauf legen. Man kann den Schritt auch auslassen, es erleichtert aber das Fixieren des Stoffs...
#2 Glueing: Now we put some paper on our floor {!} and start by spraying the glue onto the MDF {NOT us - the glue is quite nasty on hairs, hands and...well, what else with 'h'?? Sorry, this is better in German, lol}, then put the rubber foam onto it. You can skip this step, but it's easier to fix the fabric if the foam doesn't shift...
 ;o)} eine Unterlage auf unseren Boden und beginnen, in dem wir die MDF-Platte mit Sprühkleber einnebeln {nicht uns - das Zeug ist echt lästig auf Haaren, Händen und Hund}, kurz antrocknen lassen und dann die Schaumstoff-Platte darauf legen. Man kann den Schritt auch auslassen, es erleichtert aber das Fixieren des Stoffs...
#2 Glueing: Now we put some paper on our floor {!} and start by spraying the glue onto the MDF {NOT us - the glue is quite nasty on hairs, hands and...well, what else with 'h'?? Sorry, this is better in German, lol}, then put the rubber foam onto it. You can skip this step, but it's easier to fix the fabric if the foam doesn't shift...

#3 Fixieren des Stoffs: Sucht Euch einen schönen Ausschnitt aus dem Stoff und addiert für Breite und Länge ca. 15 cm größer als die MDF-Platte {je nachdem, wie dick Schaumstoff und Platte sind} und platziert den Stoff auf der Platte.
Dreht das ganze auf die Rückseite und fixiert den Stoff mit den Polsternägeln (oder mit dem Elektrotacker). Achtet neben Vermeidung von Falten darauf, dass der Schaumstoff nicht zusehr komprimiert wird, es sei denn, der "gnubbelige" Effekt ist gewünscht. {Nebenbei bemerkt, mein Freund hat für das folgende Foto Modell gestanden... ;o)}
 #3 Fixing the fabric: Choose your desired part of the fabric design {if it's a pictural print} and cut the width & length at least 15 cm longer than the MDF {depends on thickness of rubber foam and mdf} and place the fabric on the board. Now turn it on the back and fix the fabric with the tin-plated tacks (or with the staple gun). Beside avoiding wrinkles in the fabric you shoud avoid to pack the rubber foam too tightly...unless you like the wobbly effect... {BTW, my boyfriend modeled for this pic... ;o)}
 #4 Tipp: Die Ecken sollten nicht zu dick werden, damit das Ganze noch in den Rahmen passt!
#4 Tip: Be sure the edges won't get too bulky so the whole thing still fits in the frame later on!
 # 5 Anbändeln ;o): Jetzt könnt Ihr Euch mit dem Schrägband austoben...ich habe, da der Print auf dem Stoff recht groß war, nur wenige Bänder genommen und sie ineinander verwoben. Bei den anderen Memoboards habe ich ein Rautenmuster geformt und die Kreuzungspunkte mit Polsternägeln fixiert.
#5 Tie the bonds ;o): Now you can play with the bias tape (or whatever you chose)...because the print on my fabric was quite big I decided to take only a few bands and weaved them. On the other memoboards I shaped a diamond pattern and fixed the intersections with tin-plated tacks (upholstery nails...???)
 #6 Einrahmen: Man könnte das Memoboard auch so verwenden, aber alles in seinem Rahmen, ;o). Die mit Stoff bespannte MDF-Platte wird jetzt in den Rahmen gelegt (sie sollte auf der Vorderseite etwas herausschauen) und auf der Rückseite mit der Rückwand des Rahmens verschlossen (sieht schöner aus). Da es zu dick für die eigentliche Fixierung ist, habe ich wieder die bewährten Polsternägel genommen, und die Rückwand damit fixiert.
Et volià, fertig ist das Memoboard!
 #6 Enframe: You could already use the memoboard as it is, but I like things framed ;o). Place the covered MDF now into the frame (it should 'pop out' of the frame) and then cover the back with the 'back board' of the frame (it's just neater). Because my version is to thick for the initial fixation, my trusted tin-plated tacks are used once again to hold the back board in place.
Et volià, your unique memoboard is finished!
Thanks for stopping by,
happy memoboarding ;o)
Julia
This comment has been removed by the author.
ReplyDeleteHallöchen!
ReplyDeleteSieht ja Spitze aus!
Jetzt weiß ich auch endlich was ich mit meinem Ikea-Rest mache - Memoboard passend zur Gardine - danke! *kiss*
LG Jutta